
Radio Control
|
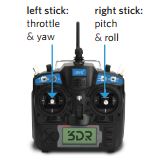
IRIS+ can be controlled using only an RC transmitter or through a combination of RC and a laptop or tablet ground station. You manoeuver IRIS+ in flight using the controller sticks shown on the left.
We start with an explanation of what the left stick controls, which is the throttle and the yaw.
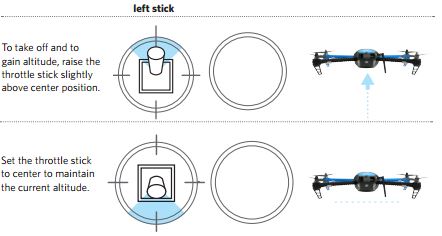
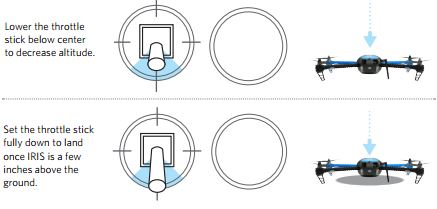
Move the left stick up and down to control altitude.
|
|
|
|
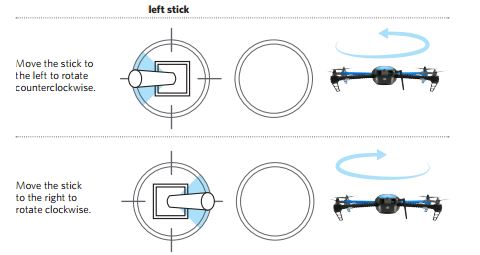
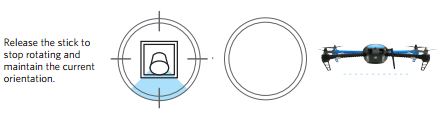
Move the left stick horizontally to rotate IRIS+ and change orientation. For a slow rotation, move the stick slightly away from the center
in either direction. Moving the stick farther from the center creates a faster rotation.
in either direction. Moving the stick farther from the center creates a faster rotation.
|
|
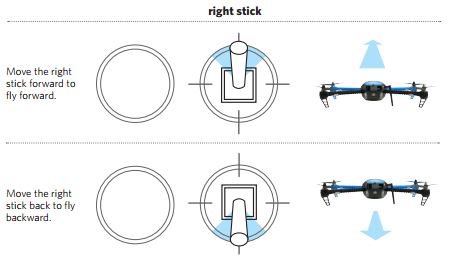
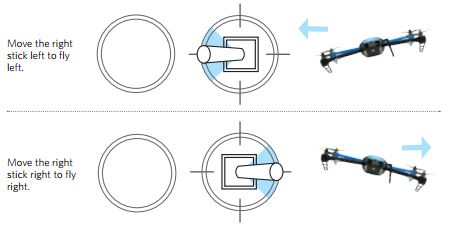
The right stick controls the pitch and roll of the IRIS+. Move the right stick to tell IRIS+ to move in that direction: forward (toward the blue arms),
back (toward the black arms), left (toward the left arms), or right (towards the right arms). How far you move the stick from the centre before releasing it tells IRIS+ how fast to move.
back (toward the black arms), left (toward the left arms), or right (towards the right arms). How far you move the stick from the centre before releasing it tells IRIS+ how fast to move.
|
|
Flight Tip: IRIS+ moves according to its orientation. The blue arms and white lights face forward, and the black arms and red lights face backward. Before using the right stick, use yaw to keep IRIS+ facing in outward orientation so that the black arms and red lights face towards you and the blue arms and white lights face away from you.
Flight Modes
|
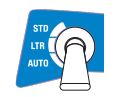
IRIS+ includes three main flight modes: manual flight (STD-altitude hold), hover mode (LTR-loiter), and mission flight (AUTO). Use the switch on the right side of the controller to select a flight mode.
|

|

|
Standard (altitude hold mode), STD
Start your flight in standard to select altitude hold mode, and fly IRIS+ manually using the controller. |
|
Loiter mode, LTR
Select loiter to set IRIS+ to hover in place automatically. Use the controller to adjust IRIS’ position then release the sticks to hold that position. Loiter is a great way for beginners to learn how to fly! If you’re new to flying, start your first flight in loiter instead of standard. |

|
|
Auto mode, AUTO
Select auto mode to fly an autonomous mission. IRIS+ will automatically fly the series of waypoints saved to the autopilot. Caution: Do not activate auto mode unless you have saved a mission to IRIS+ using a ground station application. |
|
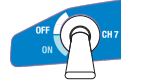
Land, CH 7
There is also an additional flight mode called Land. In this mode, set the CH 7 switch to ON to end your flight and land IRIS+ at its current position. Once you activate land, set the throttle stick fully down, and IRIS+ will automatically disarm after landing. IRIS+ will not disarm automatically unless the throttle stick is set fully down. |
|
|
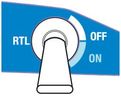
Return to launch (RTL)
This is a useful mode if you find yourself in any trouble and wish to return IRIS+ to the launch point for any reason. When this mode is activated (setting the RTL switch to ON), IRIS+ will automatically fly itself back to the lauch point. Ensure that the RTL switch is set to OFF before takeoff. |
|
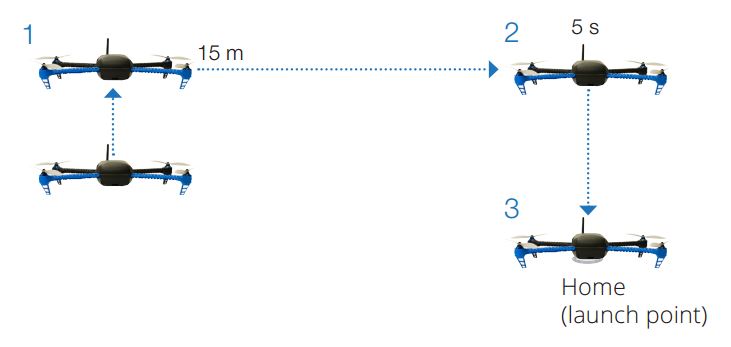
When commanded to RTL, IRIS+ will:
1 Achieve minimum altitude of 15 m (50 ft) or maintain current altitude if above 15 m. 2 Move to launch point and loiter for 5 seconds. 3 Land at launch point. Note: RTL returns IRIS+ to the location where IRIS+ was armed. Always arm IRIS+ in a safe, unobstructed launch point. |
|

|
Gimbal control, TILT |
Geofence
There is a new safety feature of the IRIS+ called the geofence. This restricts IRIS+ to within 300 meters (980 feet) of the launch point and under 100 meters (320 feet) in altitude. If IRIS+ reaches the edge of the geofence, it will initiate an automatic return to launch.
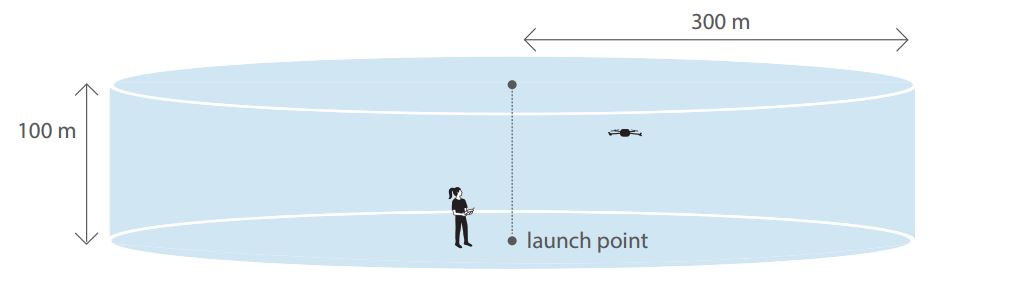
Caution: In the event of a GPS failsafe, the horizontal geofence will be disabled. If IRIS+ breaches the vertical geofence during a GPS failsafe, it will land at its current position.
Mission Planner
|
Mission Planner is an open-source ground station for the APM autopilot platform. Connect IRIS+ to a laptop using Mission Planner and the telemetry radio ground module to view data and execute commands in flight.
See the install software section to download Mission Planner for Windows or APM Planner for Mac and Linux. APM Planner is a developing version of Mission Planner for all three platforms; instructions for Mission Planner can also be used for APM Planner. 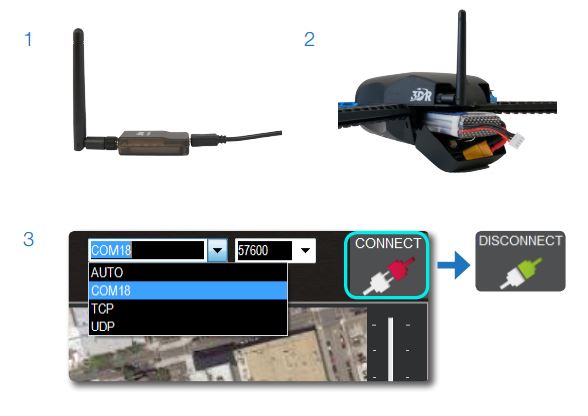
Connect to Mission Planner
|

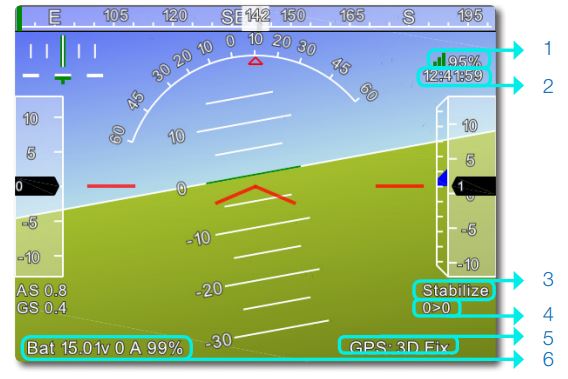
Mission Planner Flight Data: Attitude
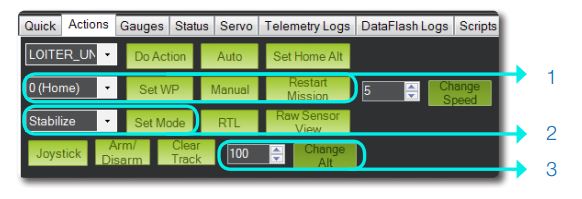
Actions
|
Status
|

Flight Map
|
Using a Tablet
|
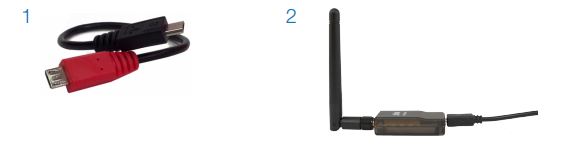
View in-flight data from your Android tablet! This exciting functionality is available using the Andropilot and DroidPlanner apps, developed by the open-source community for the APM autopilot platform. The provided Android tablet adapter cable and telemetry radio ground module allow
you to connect IRIS+ to Andropilot or DroidPlanner and access many of the same features found in Mission Planner as well as some features unique to tablets. Visit the Google Play store to download the apps and view a list of compatible devices. |
|

|

|
|