
This is a quick guide to show you how to plan your first arducopter mission. This will enable you to turn on your arducopter UAV, put it into auto mode, and then arducopter will take-off, then fly to a series of waypoint and land, all on its own!
This guide is just a basic introduction to planning a autonomous Arducopter mission, a future guide will be released showing some more advanced missions with arducopter, such as following a point with a camera, triggering a camera etc...
This guide is just a basic introduction to planning a autonomous Arducopter mission, a future guide will be released showing some more advanced missions with arducopter, such as following a point with a camera, triggering a camera etc...
Before you fly your first auto mission it is important that your arducopter is properly setup, and you have flown a few times and are confident that everything is working correctly.

The first thing you need to do it open your APM mission planner that you used to configure your arducopter. It is best to connect your Ardupilot Mega board to your computer so you can save the waypoints. Once you have connected, click on the Flight Planner Tab.
Home Location
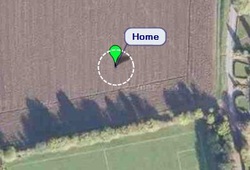
When you turn on your Arducopter at the flying field, it will try to get a GPS lock. Ardicopter will then save this position that it gets a GPS lock as the home location. This home location is used as the reference point, and all the waypoint altitudes are relative to the home altitude.
If you are planning the mission at home and do not have a home position, you can simply click on the Home Location text on the bottom to choose a new location.
If you are planning the mission at home and do not have a home position, you can simply click on the Home Location text on the bottom to choose a new location.
Adding Waypoints
To add a waypoint you simply need to click on the map. However before yous tart adding waypoints, you may want to change some settings.
- WP Radius - this is the distance around a waypoint that arducopter needs to be within, before it assumes the waypoint has been reached.
- Loiter Radius - this is the radius of a circle that arducopter will loiter around if a loiter waypoint has been selected.
- Default Alt - this is the default altitude of a waypoint that you add.

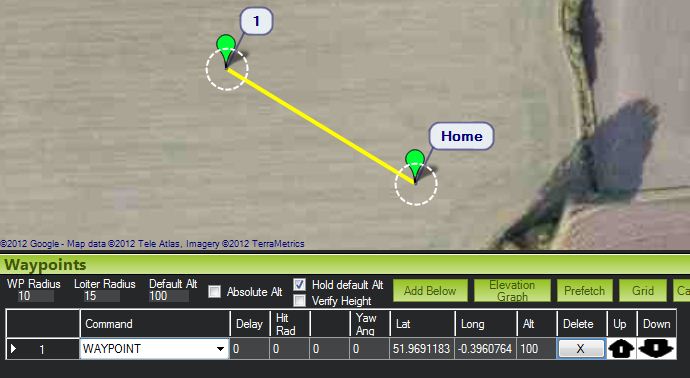
To add your first waypoint, simply click on the map where you want it to be. You will notice that on the bottom section of the screen, the waypoint table will show your recently added waypoint. To change waypoint parameters, simply click on the waypoint you want to change on the waypoint table, then you can change things such as the Alt. The table column headings dynamically change depending on what type of waypoint you are using.
You can change the type of waypoint command by selecting the dropdown box on the corresponding wapoint.
You can change the type of waypoint command by selecting the dropdown box on the corresponding wapoint.
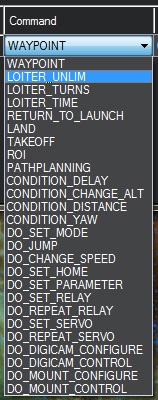
There are many different types of waypoints that you can use with your Arducopter. The list of waypoints can be found here
However in this basic mission we will only be using the TakeOff, Waypoint, Conditional, and Landing commands.
There are three main types of commands that you can use, each of them are briefly explained below
However in this basic mission we will only be using the TakeOff, Waypoint, Conditional, and Landing commands.
There are three main types of commands that you can use, each of them are briefly explained below
- Waypoint Commands - these are traditional waypoints, and include points that you can fly to, points you must loiter around, take-off and landing waypoints
- Conditional Commands - these are based on some condition, for example you can have a conditional delay command that will only execute the next command once the delay condition is met
- Do commands - these are commands that result in some sort of action, they can be actions like triggering a camera, moving a servo to deploy landing gear etc...
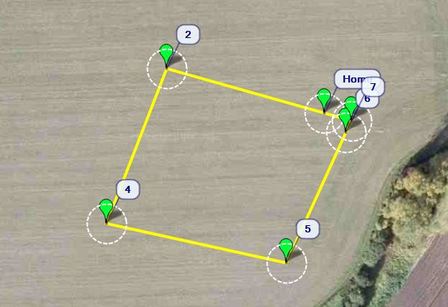
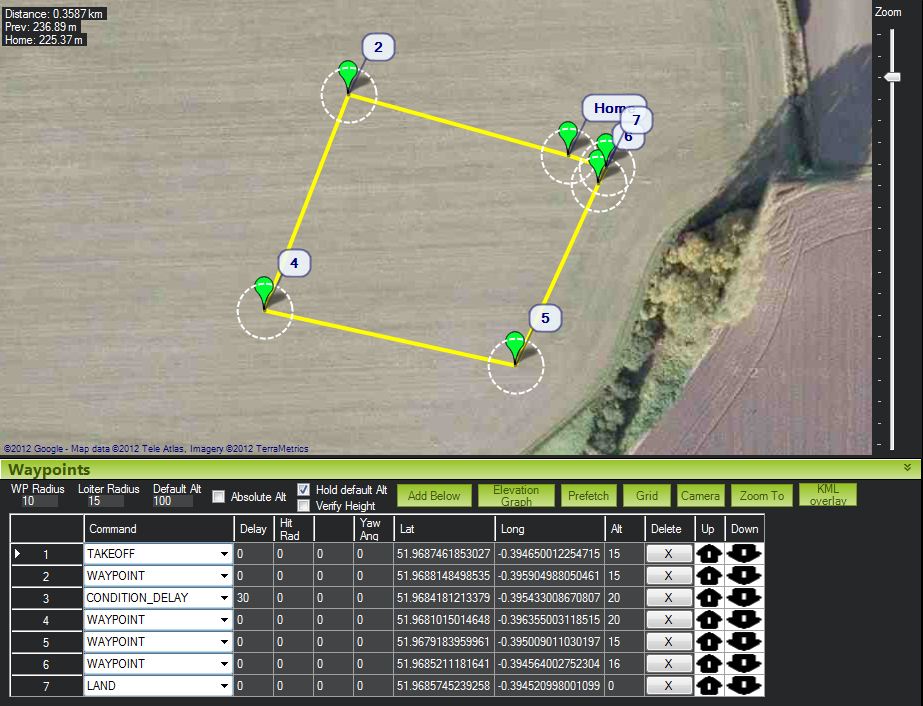
Completed Mission Plan
Continue to add as many waypoints and commands that you want.
Remember that the first command should be a takeoff command. A take-off command will simply launch your arducopter, and keep the position until the take-off altitude has been met, then continue onto the next waypoint.
Finally your mission should end with a landing command. this is similar to the takeoff command where your arducopter will decend slowly while holding its position. The motors will not turn off until you turn off auto flight mode.
| basic-arducopter-mission.txt |
You can download the above mission plan here
The above mission includes a conditional waypoint to show you how it can be used. The Delay condition was used in the above mission. This will mean that once arducoptee reaches waypoint to, it will say there untill 30 seconds have passed.
That is how easy it is to plan a simple autonomous mission for your arducopter! A future guide will be released showing some more advanced missions.
 RSS Feed